1
2
3
4
5
6
7
8
9
10
11
12
13
14
15
16
17
18
19
20
21
22
23
24
25
26
27
28
29
30
31
32
33
34
35
36
37
38
39
40
41
42
43
44
45
46
47
48
49
50
51
52
53
54
55
56
57
58
59
60
61
62
63
64
65
66
67
68
69
70
71
72
73
74
75
76
77
78
79
80
81
82
83
84
85
86
87
88
89
90
91
92
93
94
95
96
97
98
99
100
101
102
103
104
105
106
107
108
109
110
111
112
113
114
115
116
117
118
119
120
121
122
123
124
125
126
127
128
129
130
131
132
133
134
135
136
137
138
139
140
141
142
143
144
145
146
147
148
149
150
151
152
153
154
155
156
157
158
159
160
161
162
163
164
165
166
167
168
169
170
171
172
173
174
175
176
177
178
179
180
181
182
183
184
185
186
187
188
189
190
191
192
193
194
195
196
197
198
199
200
201
202
203
204
205
206
207
208
209
210
211
212
213
214
215
216
217
218
219
220
221
222
223
224
225
226
227
228
| import sys
from ncclient import manager
from ncclient.xml_ import to_ele
DEVICE_PARAMS = {'name': 'h3c'}
USER = 'admin'
PASS = 'Password@123'
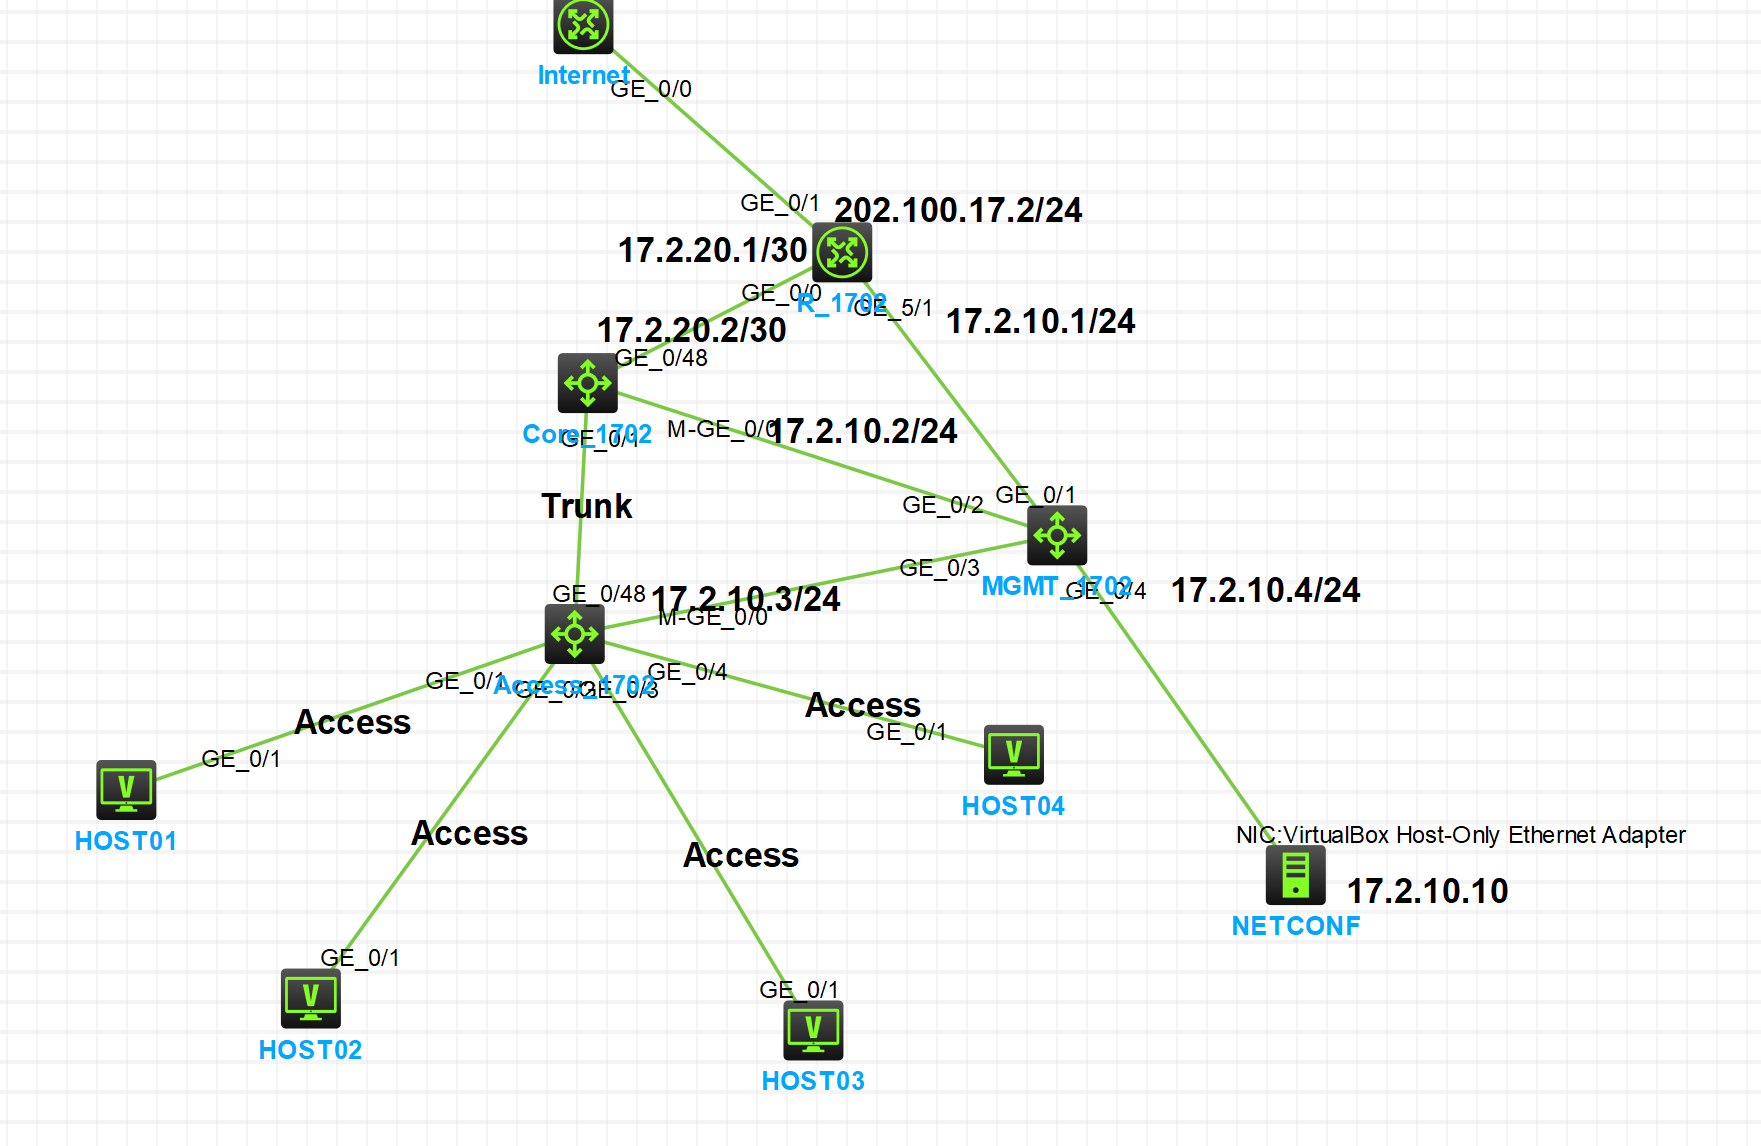
IP_ROUTER = '17.2.10.1'
IP_CORE = '17.2.10.2'
IP_ACCESS = '17.2.10.3'
PORT_AC_UP = "GigabitEthernet1/0/48"
PORT_CORE_DOWN = "GigabitEthernet1/0/1"
PORT_CORE_UP = "GigabitEthernet1/0/48"
PORT_R_LAN = "GigabitEthernet0/0"
PORT_R_WAN = "GigabitEthernet0/1"
def get_vlan_create_xml(vlan_list):
vlans_xml = ""
for vid, vname in vlan_list:
vlans_xml += f"""
<VLANID>
<ID>{vid}</ID>
<Name>{vname}</Name>
</VLANID>"""
return f"""
<config>
<top xmlns="http://www.h3c.com/netconf/config:1.0">
<VLAN>
<VLANs>{vlans_xml}</VLANs>
</VLAN>
</top>
</config>
"""
def get_port_linktype_xml(interface_name, link_type):
return f"""
<config>
<top xmlns="http://www.h3c.com/netconf/config:1.0">
<Ifmgr>
<Interfaces>
<Interface>
<IfIndex>{interface_name}</IfIndex>
<LinkType>{link_type}</LinkType>
</Interface>
</Interfaces>
</Ifmgr>
</top>
</config>
"""
def get_access_vlan_xml(interface_name, vlan_id):
return f"""
<config>
<top xmlns="http://www.h3c.com/netconf/config:1.0">
<Ifmgr>
<Interfaces>
<Interface>
<IfIndex>{interface_name}</IfIndex>
<PVID>{vlan_id}</PVID>
</Interface>
</Interfaces>
</Ifmgr>
</top>
</config>
"""
def get_trunk_permit_xml(interface_name, vlan_ids_str):
return f"""
<config>
<top xmlns="http://www.h3c.com/netconf/config:1.0">
<VLAN>
<TrunkInterfaces>
<Interface>
<IfIndex>{interface_name}</IfIndex>
<PermitVlanList>{vlan_ids_str}</PermitVlanList>
</Interface>
</TrunkInterfaces>
</VLAN>
</top>
</config>
"""
def get_ip_xml(interface_name, ip, mask):
return f"""
<config>
<top xmlns="http://www.h3c.com/netconf/config:1.0">
<IPV4ADDRESS>
<Ipv4Addresses>
<Ipv4Address>
<IfIndex>{interface_name}</IfIndex>
<Ipv4Address>{ip}</Ipv4Address>
<Ipv4Mask>{mask}</Ipv4Mask>
</Ipv4Address>
</Ipv4Addresses>
</IPV4ADDRESS>
</top>
</config>
"""
def get_route_xml(dest_ip, mask_len, next_hop):
return f"""
<config>
<top xmlns="http://www.h3c.com/netconf/config:1.0">
<StaticRoute>
<Ipv4StaticRouteConfigurations>
<RouteEntry>
<Ipv4Address>{dest_ip}</Ipv4Address>
<Ipv4PrefixLength>{mask_len}</Ipv4PrefixLength>
<NexthopIpv4Address>{next_hop}</NexthopIpv4Address>
<DestVrfIndex>0</DestVrfIndex>
<DestTopologyIndex>0</DestTopologyIndex>
<NexthopVrfIndex>0</NexthopVrfIndex>
<IfIndex>0</IfIndex>
</RouteEntry>
</Ipv4StaticRouteConfigurations>
</StaticRoute>
</top>
</config>
"""
def get_dhcp_xml(pool_index, pool_name, network_ip, mask, gateway):
return f"""
<config>
<top xmlns="http://www.h3c.com/netconf/config:1.0">
<DHCP>
<DHCPConfig>
<DHCPEnable>true</DHCPEnable>
</DHCPConfig>
<DHCPServerIpPool>
<IpPool>
<PoolIndex>{pool_index}</PoolIndex>
<PoolName>{pool_name}</PoolName>
<NetworkIpv4Address>{network_ip}</NetworkIpv4Address>
<NetworkIpv4Mask>{mask}</NetworkIpv4Mask>
<GatewayIpv4Address>{gateway}</GatewayIpv4Address>
</IpPool>
</DHCPServerIpPool>
</DHCP>
</top>
</config>
"""
def get_nat_xml(interface_name):
return f"""
<config>
<top xmlns="http://www.h3c.com/netconf/config:1.0">
<NAT>
<OutboundDynamicRules>
<Interface>
<IfIndex>{interface_name}</IfIndex>
<ACLNumber>2000</ACLNumber>
</Interface>
</OutboundDynamicRules>
</NAT>
</top>
</config>
"""
def push_config(ip, step_name, xml_payload):
print(f"正在执行: {step_name} -> {ip} ...", end="")
try:
with manager.connect(host=ip, port=830, username=USER, password=PASS,
hostkey_verify=False, device_params=DEVICE_PARAMS,
allow_agent=False, look_for_keys=False) as m:
reply = m.edit_config(target='running', config=xml_payload.strip())
if "<ok/>" in reply.xml:
print(" [成功]")
else:
print(f" [警告] {reply.xml[:100]}...")
try:
m.dispatch(to_ele('<action><top xmlns="http://www.h3c.com/netconf/action:1.0"><save><file>startup.cfg</file></save></top></action>'))
except:
pass
except Exception as e:
print(f"\n [X] 失败: {str(e)}")
if __name__ == '__main__':
print("=== 学号 1702 自动化配置 (已手工创建接口版) ===")
push_config(IP_ACCESS, "Access VLAN 创建", get_vlan_create_xml([(10, "vlan10"), (20, "vlan20")]))
push_config(IP_ACCESS, "G1/0/1 -> VLAN 10", get_access_vlan_xml("GigabitEthernet1/0/1", 10))
push_config(IP_ACCESS, "G1/0/2 -> VLAN 10", get_access_vlan_xml("GigabitEthernet1/0/2", 10))
push_config(IP_ACCESS, "G1/0/3 -> VLAN 20", get_access_vlan_xml("GigabitEthernet1/0/3", 20))
push_config(IP_ACCESS, "G1/0/4 -> VLAN 20", get_access_vlan_xml("GigabitEthernet1/0/4", 20))
push_config(IP_ACCESS, "G1/0/48 设为 Trunk", get_port_linktype_xml(PORT_AC_UP, 2))
push_config(IP_ACCESS, "G1/0/48 放行 VLAN", get_trunk_permit_xml(PORT_AC_UP, "10,20"))
push_config(IP_CORE, "Core VLAN 创建", get_vlan_create_xml([(10, "vlan10"), (20, "vlan20")]))
push_config(IP_CORE, "G1/0/1 设为 Trunk", get_port_linktype_xml(PORT_CORE_DOWN, 2))
push_config(IP_CORE, "G1/0/1 放行 VLAN", get_trunk_permit_xml(PORT_CORE_DOWN, "10,20"))
push_config(IP_CORE, "Vlan-int10 IP", get_ip_xml("Vlan-interface10", "192.168.10.1", "255.255.255.0"))
push_config(IP_CORE, "Vlan-int20 IP", get_ip_xml("Vlan-interface20", "192.168.20.1", "255.255.255.0"))
push_config(IP_CORE, "Uplink IP", get_ip_xml(PORT_CORE_UP, "17.2.20.2", "255.255.255.252"))
push_config(IP_CORE, "DHCP Pool 10", get_dhcp_xml(1, "pool10", "192.168.10.0", "255.255.255.0", "192.168.10.1"))
push_config(IP_CORE, "DHCP Pool 20", get_dhcp_xml(2, "pool20", "192.168.20.0", "255.255.255.0", "192.168.20.1"))
push_config(IP_CORE, "默认路由", get_route_xml("0.0.0.0", "0", "17.2.20.1"))
push_config(IP_ROUTER, "LAN 口 IP", get_ip_xml(PORT_R_LAN, "17.2.20.1", "255.255.255.252"))
push_config(IP_ROUTER, "WAN 口 IP", get_ip_xml(PORT_R_WAN, "202.100.17.2", "255.255.255.0"))
push_config(IP_ROUTER, "回程路由", get_route_xml("192.168.0.0", "16", "17.2.20.2"))
push_config(IP_ROUTER, "NAT Outbound", get_nat_xml(PORT_R_WAN))
print("\n=== 全部配置完成! 请立即测试 Host01 自动获取 IP 和 Ping 外网 ===")
|